|
|
请使用QQ关联注册PLM之家,学习更多关于内容,更多精彩原创视频供你学习!
您需要 登录 才可以下载或查看,没有账号?注册

x
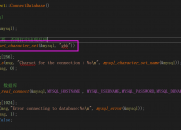
DebUGging NXOpen Java with NX8 and Eclipse IDE
1 Z+ n3 v; _1 E" O# z' h2 b& q! Y1 l% G5 E0 [. X2 P
(see PDF in the ZIP file for a pictorial description)
( N) D f' I2 ~
0 y3 w: L4 ^3 O( D# |" u6 wInstallation of Java and Eclipse
. u) F# @1 a& ]1 ]/ ^
" A( ~8 ?, d% |1)
& x: l9 O1 F( B5 S( xDownload and install the Java Standard Edition Developer Kit Java SE 6 (1.6.0_14 or higher) from9 ?, l5 I% K+ p2 t& M. X
http://www.oracle.com/technetwor ... ownloads/index.html
2 Y: v7 ?- q; a5 d% [. X* L2 t: B, |! t5 T% X
2)
% w( [7 a$ h/ O% Y- x# ~) {9 h/ `Download the Eclipse IDE for Java Developers from http://www.eclipse.org/downloads
/ Q9 d N! L& }2 \4 qand extract the ZIP and its ‘eclipse’ directory content to your preferred path, for example “d:\eclipse”
2 W. T/ a+ U4 |6 F# c, i# y# L) ^7 [+ l" |- w% \+ W2 q
7 C+ [9 }$ z5 g* j0 Q: p
Create a project with Eclipse
* j/ A: l. Y: l+ j. d0 q; |: }% |( _, r' a
3)
X; q l) ?* N/ `4 EStart the Eclipse IDE, for example “d:\eclipse\eclipse.exe”
: `' b+ b/ V; H" W: }
) Q* e6 n0 W# F. U" ]4)8 n, n( h' ]: Q. V
You will be asked for the location of your Workspace folder which is comparable to the MyProjects folder in Microsoft Visual Studio- O, }- C+ h( r+ a( q/ Z3 V+ ]6 {( c
7 z) _+ H I# f' F; K
5)
8 F, |4 ~$ z4 i% A/ cCreate a new Java Project by File -> New -> Java Project" T7 ~6 u1 D `* E* u6 w
$ N* L$ n: Z2 C% d0 T
6)# T9 ~" h4 e n _, E
Enter a project name and continue with Next
5 Y: G C- b" D L' A( g6 F1 l: Y" _- }
7) 4 X% _' y y3 T/ R$ G
On the Libraries Tab add the external NXOpen Jar packages and Finish8 \: E( K4 K, I% \' T; m
0 j2 \# [8 h2 [' m2 ~7 U5 y8)
; i& t9 |6 o* B" e( e9 _5 f1 g3 LIn the Package Explorer window make a right click on the project name and create a new Package (Namespace)
# {1 V) o( I, S' n8 L8 V d! @3 g& H& Q+ n1 |
9) : _- ? h, Z9 S4 B' `+ \! c
Enter a package name and Finish! X% Q& H9 z% Z5 W9 N4 A
0 G0 `8 _; d; E& m/ L10)
8 n3 O5 e! [2 v$ K: aIn the Package Explorer window make a right click on the Package name and create a new Class
7 o1 O2 d8 t6 z" Q" a; T8 E, z3 C1 W- {
11). } Z$ o" _" O: i
Enter a Class name and uncheck all method stubs options
" i) s) q# N9 G. w' o8 { X
7 L$ B" W5 Y: ?! y' a8 w$ J12)/ k% h0 m. B$ b# v3 G
Now you have a project created with an empty class so it’s time to complete the source code and we use the NX Journal Recording.
6 {! q; `$ P1 T' YFirst we set the NX journal language to Java by Preferences -> User Interface -> Journal -> Journal Language -> Java/ Z* M. B# d& R
. U( n- N2 n% ?0 }& S3 t# d* x, R13)
. Q8 A4 l' E& R: @! }Start Recording by Tools -> Journal -> Record
; R/ d% c) k$ L1 m) Y1 n$ \2 N6 y1 m ]8 K6 h
14) 3 S0 T- e. B+ Q, p9 m
Create a Block and finish the journal by Tools -> Journal -> Stop Recording
. N2 f& Y' z& W' X/ r; S6 ^# K( r- w1 b" M8 F* c
15)
, l$ r7 f8 g% y* X: Y! rOpen the Journal Editor by Tools -> Journal -> Edit and copy/paste the Imports and Methods to your project source file$ t: N3 N* X+ I
8 N1 l! I3 a* C% j; c1 R: W
16)3 |4 ~ }2 e) t2 r$ f# [
Make a right click in your source window and select Source -> Format to reformat the source contents with “Eclipse rules”
! P3 P: G6 D: X. a3 A4 e9 |0 |' Y F4 T5 i- f$ c1 l
17)
* l# w/ y9 }9 a* D% a, F% QFinally we create the Jar file which is mandatory in case our package contains more than one class.1 X+ s$ A& M; ?: E
In the Package Explorer right click on the project name and select Export -> JAR file -> Next
% w6 r2 d) D9 Y- L0 N8 V: k& {1 R' E7 `9 @ o* F
18)& S) E: _; Y6 j1 Q9 i. _3 H
Select the correct project, turn on Export generated class files and resources and enter the destination file name of the JAR executable.; G/ {9 L3 s; s& F/ _0 F$ |2 {- Q* D
2 P" K; V# U$ k" I0 H5 v5 ]19)8 i8 G7 f, w0 c. i% R2 S; j, I
Then proceed with Next twice, turn on Generate the manifest file, enter the Main Class and Finish6 |+ J) H( g0 z, A1 n
" O# b& s7 O$ ]! w
f, k. d ^+ b8 k5 r% E( g) F
Debug the JAR or CLASS file with NX and Eclipse
, O/ f5 i" |+ i `4 t8 x& r, g' C2 r! j! U7 y
20), x/ ^( Z# o+ d9 U9 N: [6 G
If we want to debug a single class only, we could use the compiled Java class file which can be found automatically after saving the Java source file in workspace\projectname\bin\packagename\class .' a$ O% t2 T1 D8 o7 o/ l4 L
Due to Java naming convention and limitations we don’t want to have multiple classes in one file so in that case we would use the final JAR archive file.
1 Q/ I6 o) m0 X, o9 i: EIn order to connect to the NX session, NX needs to start the JVM (Java Virtual Machine) along with some debug settings, for example the communication port between NX and Eclipse.# z6 _3 F. y" F3 ]
From a NX8 command prompt, we enter the following commands:
$ Z0 Y2 M1 L8 H. d' n/ g. X# @$ x+ |, Y, ]0 G2 m: N4 ^
>set UGII_JVM_OPTIONS=-agentlib:jdwp=transport=dt_socket,address=8000,server=y,suspend=n
7 O' n7 f7 b, B$ g- m/ n>ugraf.exe
7 ?/ j$ G; Y# f$ ^# u% Z0 T( j% T% l( w
Then we start the JVM once by File -> Execute -> NXOpen and selecting any *.class or *.jar file.6 r2 o+ [% D6 h$ N
Any simple class will do the job, for example a famous HelloWorld class.
. m/ H8 X( Q; o! E* D) C( y. ?- A$ y3 t! A$ Q; k" Z) u9 J
21)
- Y" O. h* M. D: B: GCreate the external access to the JVM session in Eclipse by Run -> Debug Configuration.' I S" N; w( E" ?3 S
On the Remote Java Application node make a right click and select New
1 F) t9 }6 Y8 L9 _3 H8 Z2 [$ }- o& h7 x3 N
22)& E: p! q. M; R% }" X* e
Enter the Project you want to debug and make sure that the Port maTChes the address from UGII_JVM_OPTIONS
, F7 w$ L' ]% l) r: b9 L
) l* p+ ]% O1 B; ?+ `# m23) ?: y9 N9 ^& a( ?, |! z
Don’t forget to set one or more breakpoints in your code where you want to interrupt execution* [3 l+ z4 [, ?* o) l1 c4 j! x$ `
1 ^; ^ [- {/ X0 }2 |4 D5 L( E24)
& N: s( m" |) F( {. PFinally execute the JAR file or CLASS file in NX that you want to debug.
+ L! ^8 u* e! p( C4 K0 POnce the breakpoint is hit, switch to the Eclipse application, confirm to change to the Debug Perspective View and Step through your code as desired., G0 q/ A, H9 N3 l$ W
3 f' g7 I& Q& N& sThat's it.
! b9 `7 h% {2 x7 \3 l& l7 a |
|


 |小黑屋|手机版|PLM之家-专注工业软件生态建设,大模型CAD创新生态